User Guide
Hello to all salespeople! Welcome to our user guide on Only Sales! Whether you are technical or not doesn’t matter! This guide is for you! (If you’re unsure of anything, you can refer to the glossary at the end of this guide.)
OnlySales is a desktop app for managing contacts, optimised for Salespeople, especially tech salespeople. What makes OnlySales unique is that it is a Command Line Interface-based (CLI) app. Essentially, what it means is that if you can type fast, OnlySales can get your contact management tasks done faster than traditional apps that need you to use a mouse.
Why OnlySales?
As a salesperson, you need to:
- Track hundreds of contacts
- Quickly search and filter their contact information
- Send multiple follow-up emails quickly
Whether you are on the go with your slim notebook or at home with your mechanical keyboard, OnlySales is your friend to help you close all those SALES, with ONLY your keyboard!
Key Features
- Why OnlySales?
- Key Features
- Quick start
-
Features
- Viewing help :
help - Adding a person:
add - Listing all persons :
list - Changing a person’s status:
status - Editing a person :
edit - Finding customers:
find - Tag View and Status View Integration
- Deleting a person :
delete - Managing email templates :
- Import contacts:
import - Export contacts:
export - Clearing all entries :
clear - Exiting the program :
exit - Saving the data
- Editing the data file
- Viewing help :
- FAQ
- Known issues
- Glossary
- Command summary
Quick start
Step 1: Install Java (if you don’t have it already)
OnlySales needs Java to run. Java is a free program that runs applications on your computer—think of it as the engine that powers OnlySales. You need any version of Java version 17 installed (version 17.x.x).
How to check if you have the right version of Java:
- On Windows: Press the Windows key, type either “cmd” or “Command Prompt” and press Enter. In the window that opens, type
java -versionand press Enter. - On Mac: Open the Terminal app (found in Applications > Utilities) and type
java -version. - On Linux: Open your terminal and type
java -version.
If you need to install Java, follow these guides:
Step 2: Download OnlySales
Go to this page and download the latest file that ends in .jar.
Step 3: Choose where to put OnlySales
-
Create a new folder on your computer (or choose an existing one) where you want to keep OnlySales. This will be where OnlySales will store all your contacts and settings.
-
Move or copy the
.jarfile you downloaded into this folder.
 Tip: You might want to create or use a blank folder to avoid clutter. It can be called “OnlySales” on your Desktop or Documents folder for easy access.
 Step 4: Launch OnlySales
-
Open a command terminal (also called Command Prompt on Windows or Terminal on Mac):
- Windows: Press the Windows key, type either “cmd” or “Command Prompt”, and press Enter
- Mac: Open the Terminal app from Applications > Utilities
- Linux: Press Ctrl+Alt+T or search for “Terminal” in your applications menu
-
Navigate to your folder: In the terminal window, type
cdfollowed by a space, then drag and drop your OnlySales folder into the terminal window (this automatically types the folder path), and press Enter. -
Start OnlySales: Type
java -jar OnlySales.jarand press Enter to open the file. - The app similar to the image below should appear in a few seconds. You’ll see some sample contacts to help you get started.
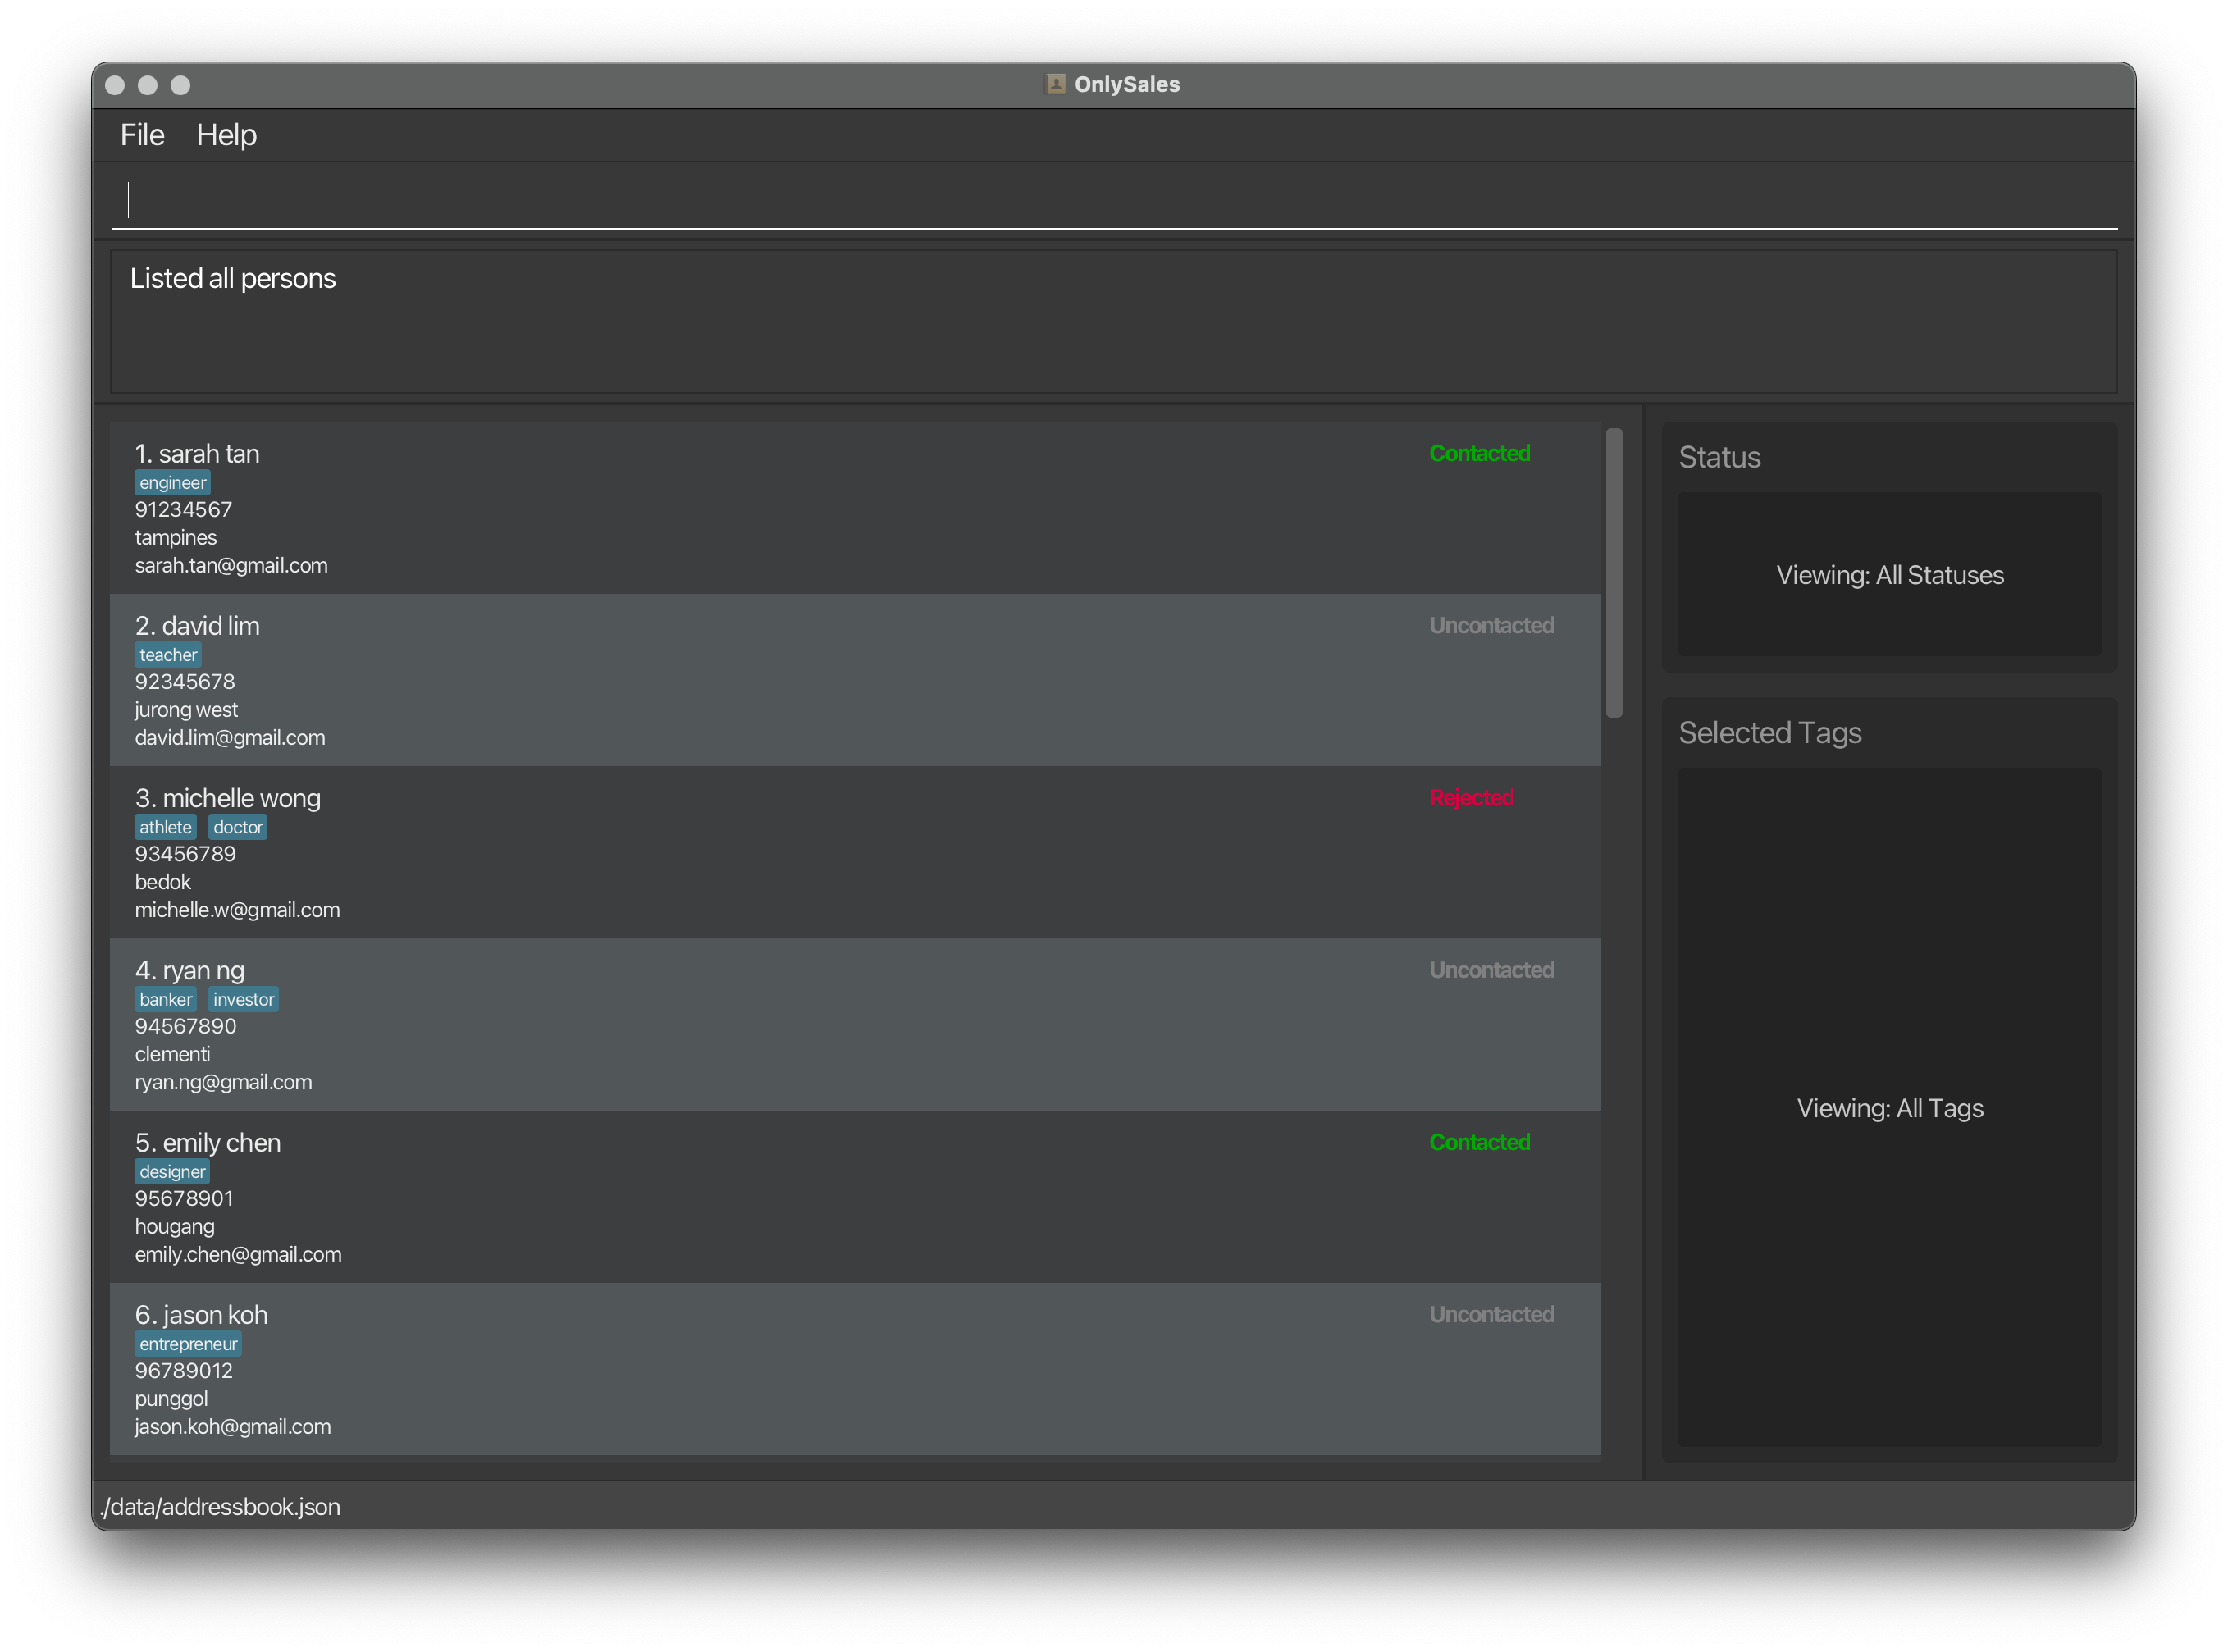
Sample screenshot of the app
Step 5: Try your first commands
You’ll see a text box near the top of the OnlySales app — this is where you type commands.
Here are some simple commands to get you started:
-
Type
helpand press Enter to open the help window. -
Type
listand press Enter to see all your contacts. -
Type
add n:John Doe p:98765432 e:johnd@example.com a:John street, block 123, #01-01and press Enter to add a new contact.What do those letters mean? The
n:,p:,e:, anda:are shortcuts that stand for Name, Phone, Email, and Address. For more details, refer to the Features section below. -
Type
delete 3and press Enter to remove the 3rd contact from your list (be careful — this cannot be undone!). -
Type
template s:Contactedand press Enter to open the email template editor for contacts you’ve already contacted. -
Type
clearand press Enter to delete all contacts (no undo button, use with caution!). -
Type
exitand press Enter to close OnlySales.
That’s it! You’re ready to start managing your contacts. For more detailed information about each command and all the features OnlySales offers, check out the Features section below.
Features
 Notes about the command format:
-
Words in
UPPER_CASEare the parameters to be given by the user.
e.g. inadd n:NAME,NAMEis a parameter which can be used asadd n:John Doe. -
Items in square brackets are optional.
e.gn:NAME [t:TAG]can be used asn:John Doe t:friendor asn:John Doe. -
Items with
… after them can be used multiple times including zero times.
e.g.[t:TAG]…can be input as ` ` (i.e. blank string, indicating 0 times),t:friend,t:friend t:familyetc. -
Parameters can be in any order.
e.g. if the command specifiesn:NAME p:PHONE_NUMBER,p:PHONE_NUMBER n:NAMEis also acceptable. -
Extraneous parameters for commands that do not take in parameters (such as
help,list,exitandclear) will be ignored.
e.g. if the command specifieshelp 123, it will be interpreted ashelp. -
If you are using a PDF version of this document, be careful when copying and pasting commands that span multiple lines as space characters surrounding line-breaks may be omitted when copied over to the application.
Viewing help : help
Shows a message explaining how to access the help page.
Format: help

Help Window
Adding a person: add
Adds a person to the address book.
Format: add n:NAME p:PHONE_NUMBER e:EMAIL [a:ADDRESS] [s:STATUS] [t:TAG]…
Parameters:
-
n:NAME- The full name of the contact (required, contains letters, numbers, spaces, and symbols such as hyphens, apostrophes, commas, slashes, periods, and some other special charaters) -
p:PHONE_NUMBER- The phone number (required) -
e:EMAIL- The email address (required) -
a:ADDRESS- The physical address (optional, max 200 characters) -
s:STATUS- The contact status (optional, defaults to “Uncontacted”. Must be one of: “Contacted”, “Uncontacted”, “Busy”, “Rejected”, “Accepted”, “Unreachable”) -
t:TAG- Tags for categorization (optional, can have any number of tag (including 0). Each tag consist of only lowercase alphanumeric characters not longer than 50 characters. None of the tag value can be empty. )
Tip:
Person with the same phone number, is considered as duplicate and cannot be added. But we treat +6598765432 and 98765432 as 2 different number, because they might not be in the same country code.
Examples:
add n:John Doe p:98765432 e:johnd@example.comadd n:Betsy Crowe t:friend e:betsycrowe@example.com a:Newgate Prison p:1234567 t:criminal s:contacted
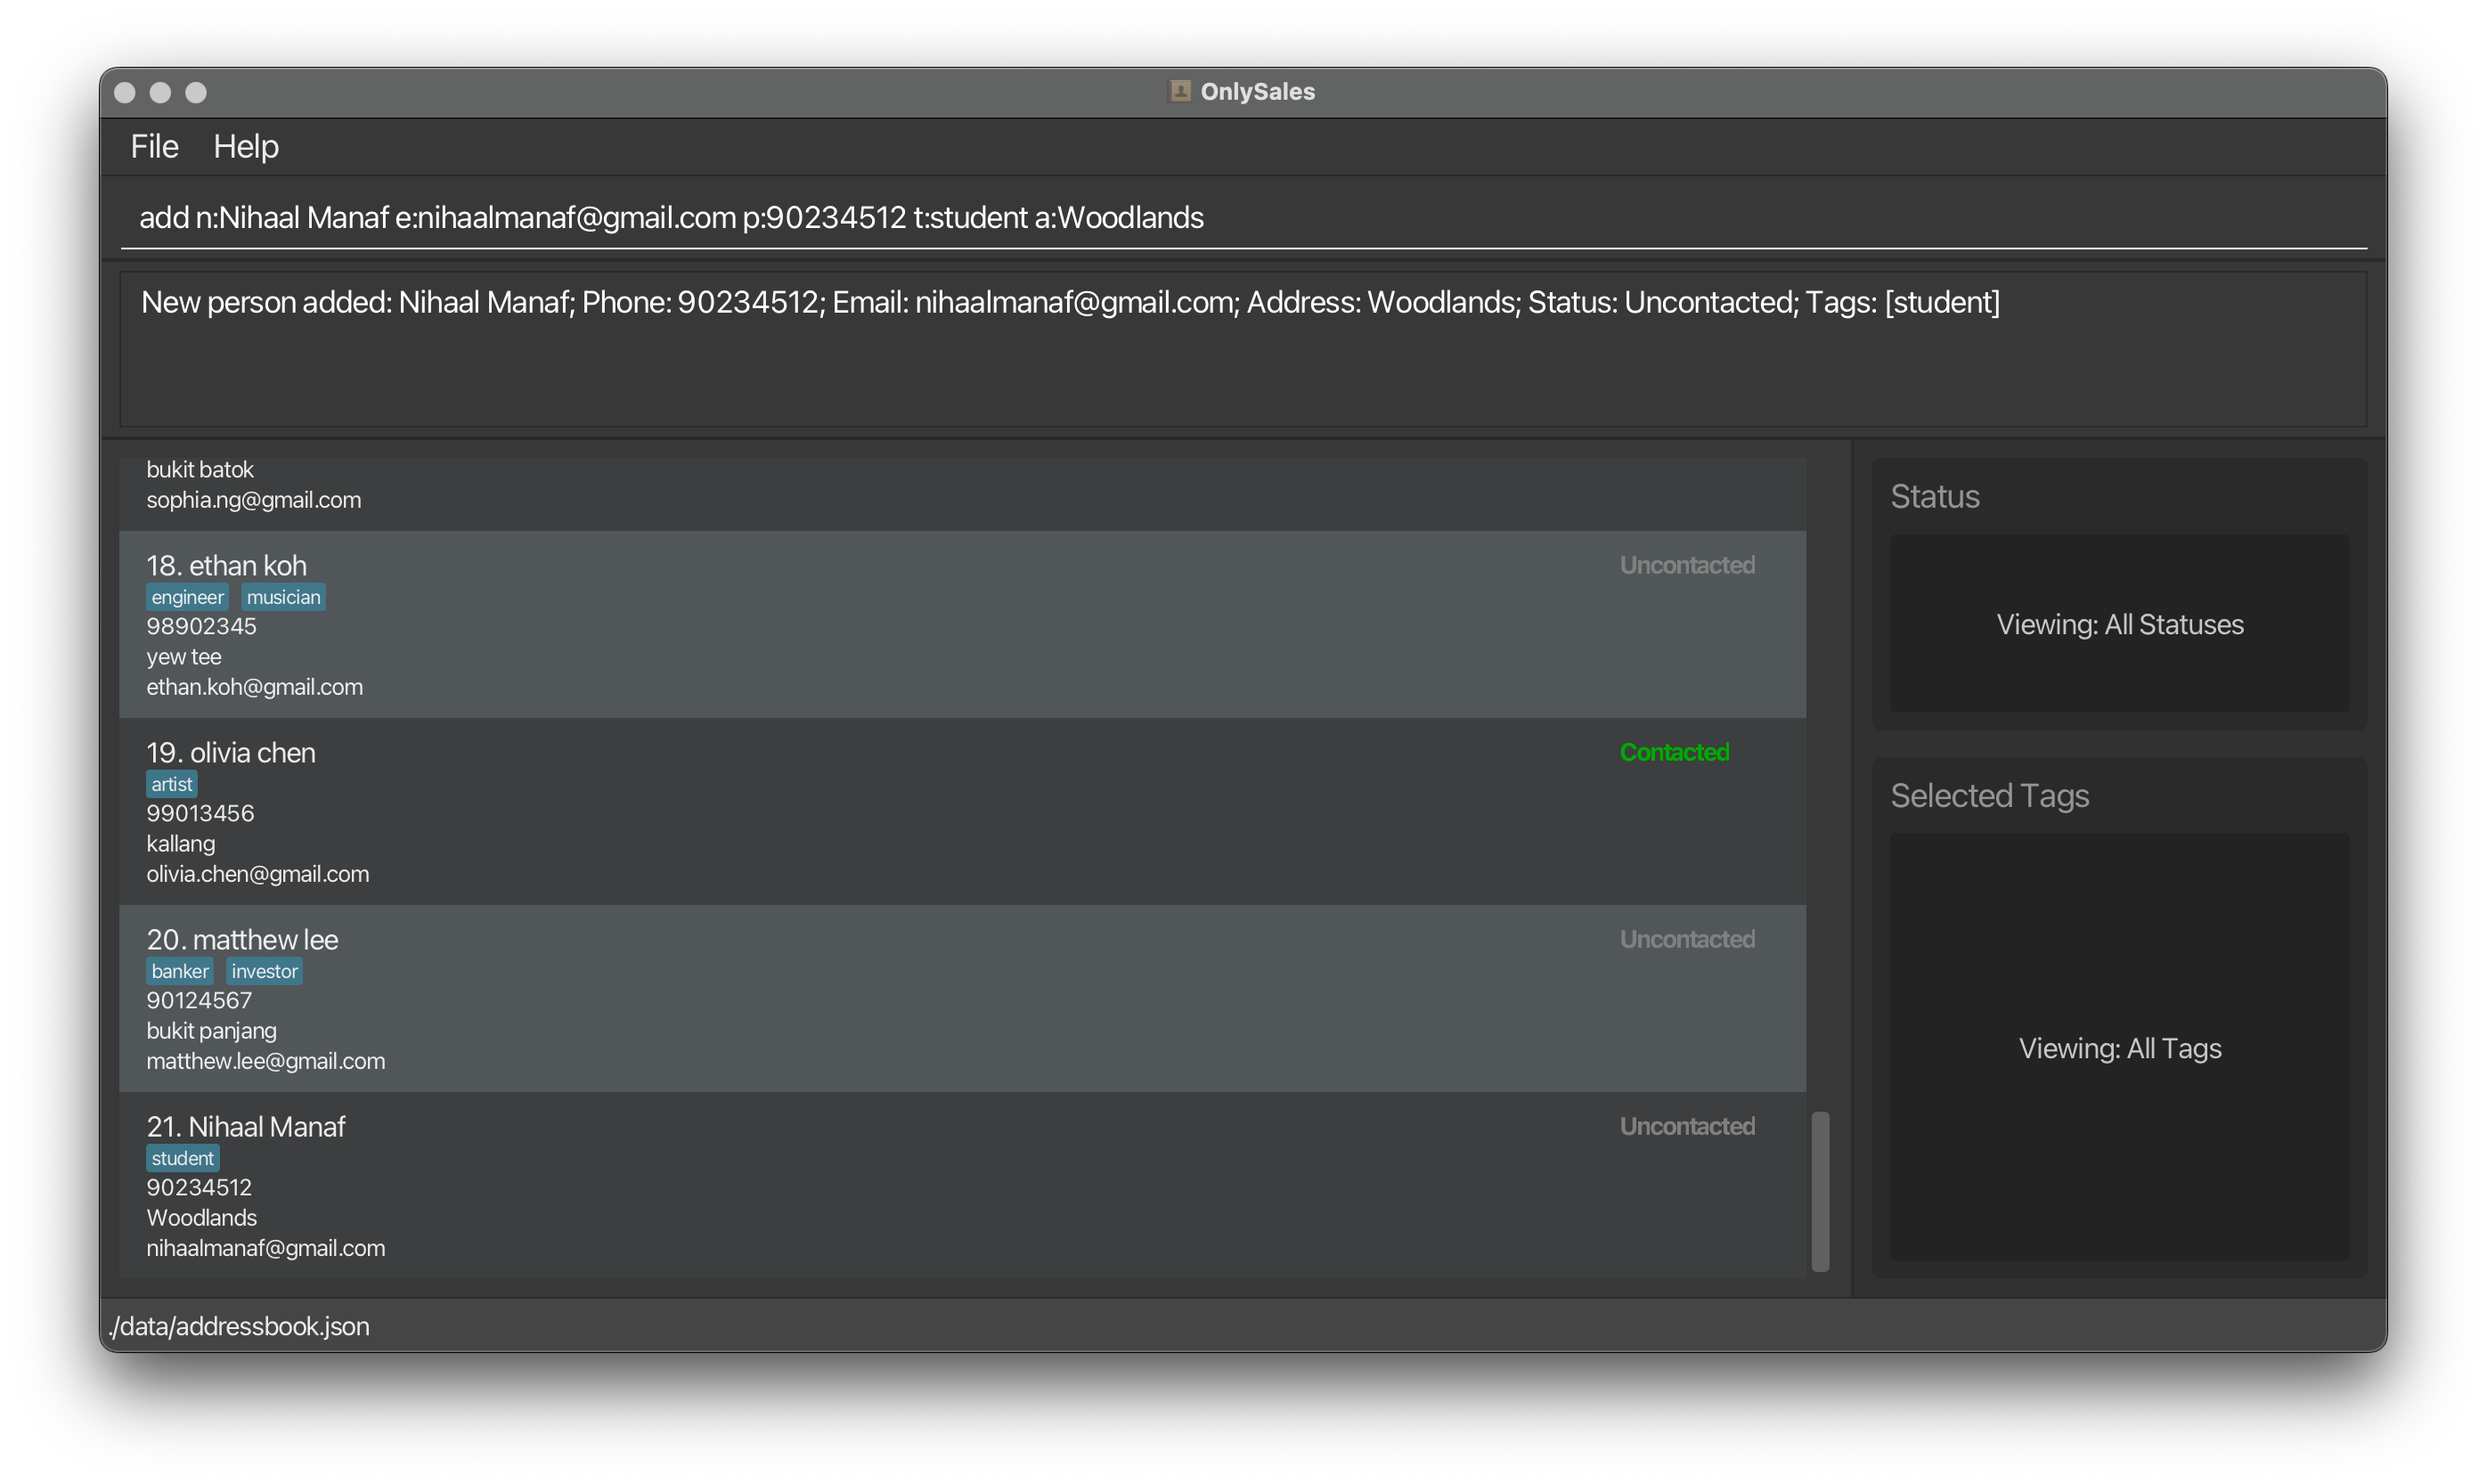
Sample Add Command Window
Listing all persons : list
Shows a list of all persons in the address book.
Format: list
Changing a person’s status: status
Sets a person’s status in the address book.
Format: status INDEX [STATUS]
- Changes the status of the person at the specified
INDEX. The index refers to the index number shown in the displayed person list. The index must be a valid number according to what is displayed in the list below (e.g., 1, 2, 3, …). This field is mandatory. - Changes the status of the person with the specified
STATUS. The status of a person can only be “Contacted”, “Uncontacted”, “Busy”, “Rejected”, “Accepted” and “Unreachable”. If no status is specified, it defaults to “Uncontacted”. - The status input is case-insensitive.
Examples:
status 12 Contactedstatus 12 Rejectedstatus 12 Accepted
Editing a person : edit
Edits an existing person in the address book.
Format: edit INDEX [n:NAME] [p:PHONE] [e:EMAIL] [a:ADDRESS] [s:STATUS] [t:TAG]...
- Edits the person at the specified
INDEX. The index refers to the index number shown in the displayed person list. The index must be a valid number according to what is displayed in the list below (e.g., 1, 2, 3, …). - At least one of the optional fields must be provided.
- Existing values will be updated to the input values.
- When editing the phone number, it needs to be unique so that the edited contact is not treated as a duplicated person.
- When editing status, the existing status of the person will be removed and replaced with the new one specified.
- When editing tags, the existing tags of the person will be removed i.e adding of tags is not cumulative.
- You can remove all the person’s tags by typing
t:without specifying any tags after it.
Examples:
-
edit 1 p:91234567 e:johndoe@example.comEdits the phone number and email address of the 1st person to be91234567andjohndoe@example.comrespectively. -
edit 2 n:Betsy Crower t:Edits the name of the 2nd person to beBetsy Crowerand clears all existing tags.
Finding customers: find
You can find customers by searching for their name, tags, status, phone number, email, or address. There are two ways to use the find command:
-
Basic search: Type one or more names after
findto look up customers by name. (See examples below.) -
Advanced search: Use prefixes like
n:,t:,s:,p:,e:, ora:to search more specifically by name, tag, status, phone, email, or address.
Use basic search when you just want to find by name. Use advanced search if you want to search by tags, status, phone, email, address, or combine several criteria!
Check the examples below for the correct usage of each search style.
Format: find NAME [MORE_NAMES] OR find [n:NAME] [t:TAG]... [s:STATUS] [p:PHONE] [e:EMAIL] [a:ADDRESS]
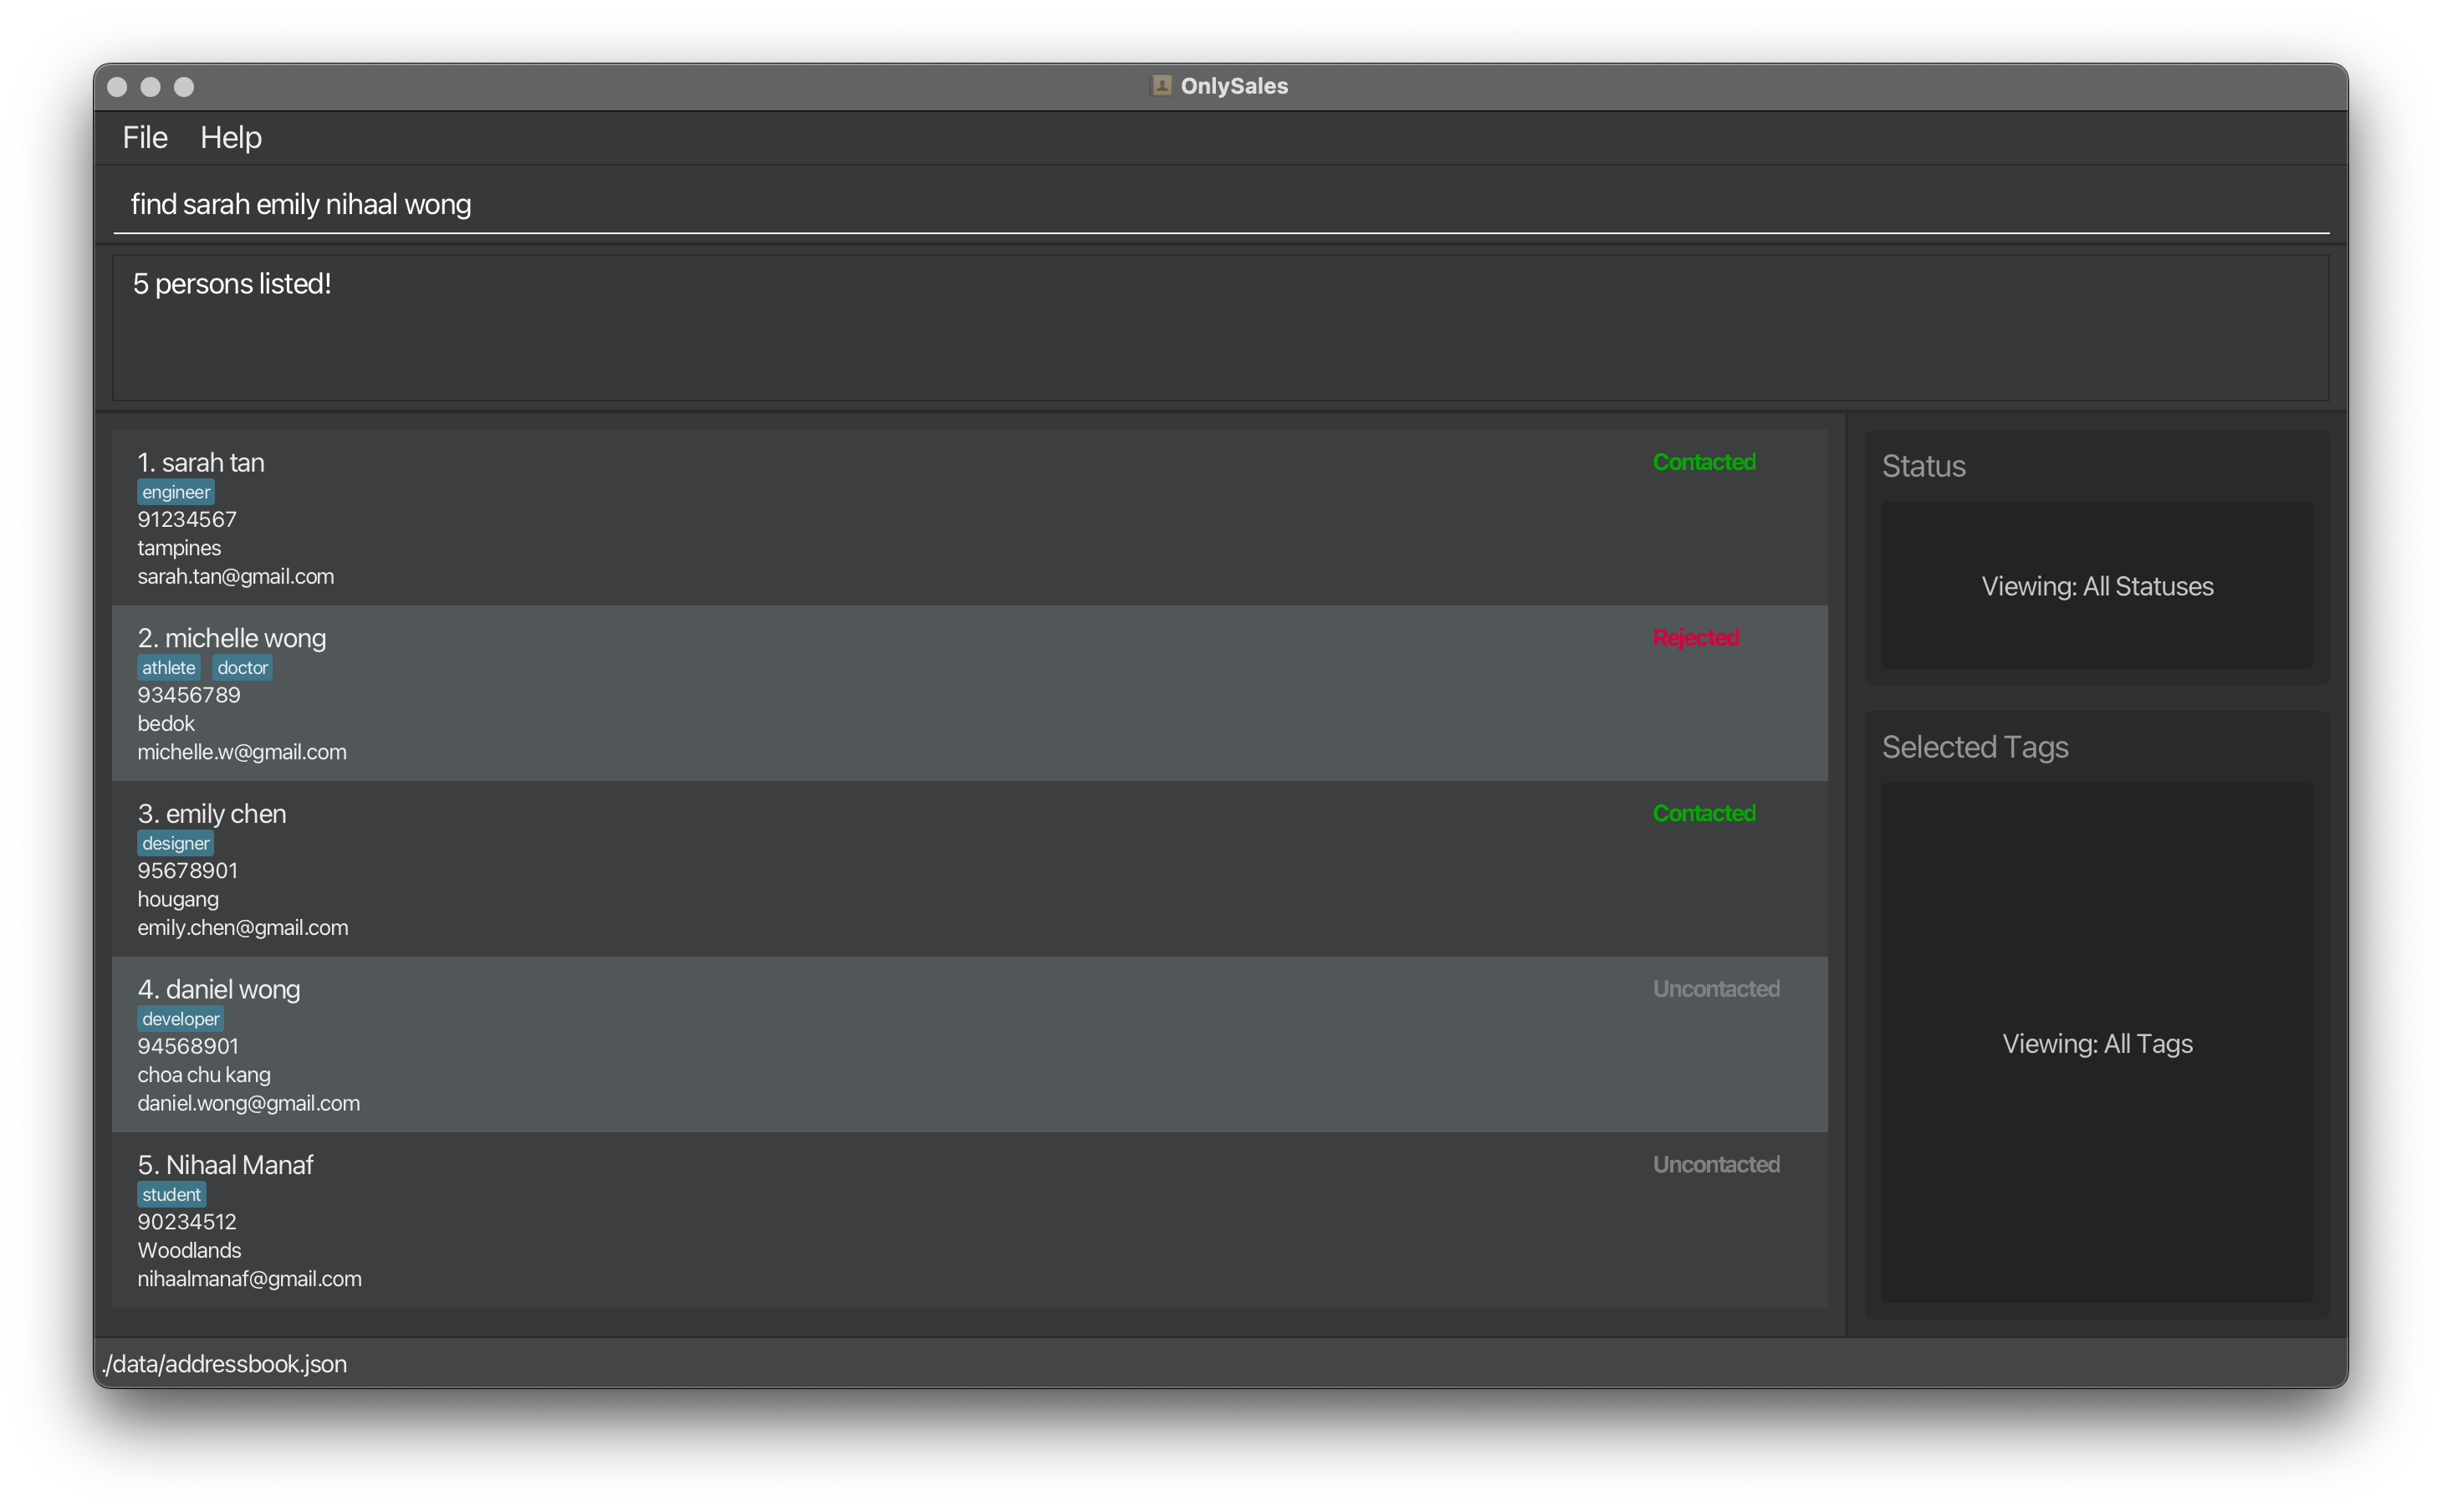
Find Command example showing Basic Search and its results
Basic Search (by name):
- The basic search is for names only!
- The search is case-insensitive. e.g
hanswill matchHans - The order of the keywords does not matter. e.g.
Hans Bowill matchBo Hans - Only full words will be matched e.g.
Hanwill not matchHans - Customers matching at least one keyword will be returned (i.e.
ORsearch). e.g.Hans Bowill returnHans Gruber,Bo Yang
Advanced Search (with prefixes):
-
n:NAME- Search by name -
t:TAG- Search by tag (can specify multiple tags) -
s:STATUS- Search by contact status (Uncontacted, Contacted, Rejected, Accepted, Unreachable, Busy) -
p:PHONE- Search by phone number -
e:EMAIL- Search by email address -
a:ADDRESS- Search by address - Multiple criteria can be combined for more precise searches
- All searches are case-insensitive
- For each advanced search command, you can specify at most one of each of the following: name, email, address, status, and phone number. You can, however, include as many tags (
t:TAG) as you like in a single search!
Note:
Do not mix styles in one command. For example, use find n:alice t:friend (advanced) or find alice (basic), not find alice t:friend.
Examples:
Basic name search:
-
find JohnreturnsjohnandJohn Doe -
find alex davidreturnsAlex Yeoh,David Li
Search by name with prefix:
-
find n:alicereturns all customers with “alice” in their name -
find n:aliwill NOT return customers with “alice” in their name
Search by tag:
-
find t:friendsreturns all customers tagged as “friends” -
find t:colleagues t:VIPreturns customers with either “colleagues” or “VIP” tags
Search by status:
-
find s:Contactedreturns all customers with “Contacted” status -
find s:Rejectedreturns all customers with “Rejected” status
Search by phone:
-
find p:91234567returns customers with matching phone number
Search by email:
-
find e:john@example.comreturns customers with that specific email
Search by address:
-
find a:Singaporereturns all customers with “Singapore” in their address -
find a:Clementireturns all customers with “Clementi” in their address
Combined multi-criteria search:
-
find n:alice t:friendsreturns customers named Alice who are tagged as friends -
find n:john s:Contactedreturns customers named John with “Contacted” status -
find t:VIP s:Uncontactedreturns VIP customers who haven’t been contacted yet -
find n:alice t:friends s:Contactedreturns customers named Alice, tagged as friends, and with “Contacted” status -
find s:Contacted s:Uncontactedreturns an error as you can only search for one status!
Tip:
If you’re wondering why we have 2 kinds of find command, it’s to allow you to search either as broadly as possible (using basic search) or as specific as possible (using advanced search). Sky’s the limit!
Tag View and Status View Integration
When dealing with a large number of customers, it is important that salespeople can immediately identify the active filters applied to the customer list.
Key Features:
- Tag view displays all currently active tag filters
- Status view displays all currently active status filters
- Both views update automatically when using the
findcommand witht:ors:prefixes
Tip:
When you use find t:friends s:Contacted, the Tag view will highlight “friends” and the Status view will highlight “Contacted”, making it easy to see your current filters at a glance.
Visual Example:
| Default View | After Find Command with Filters |
|---|---|
|
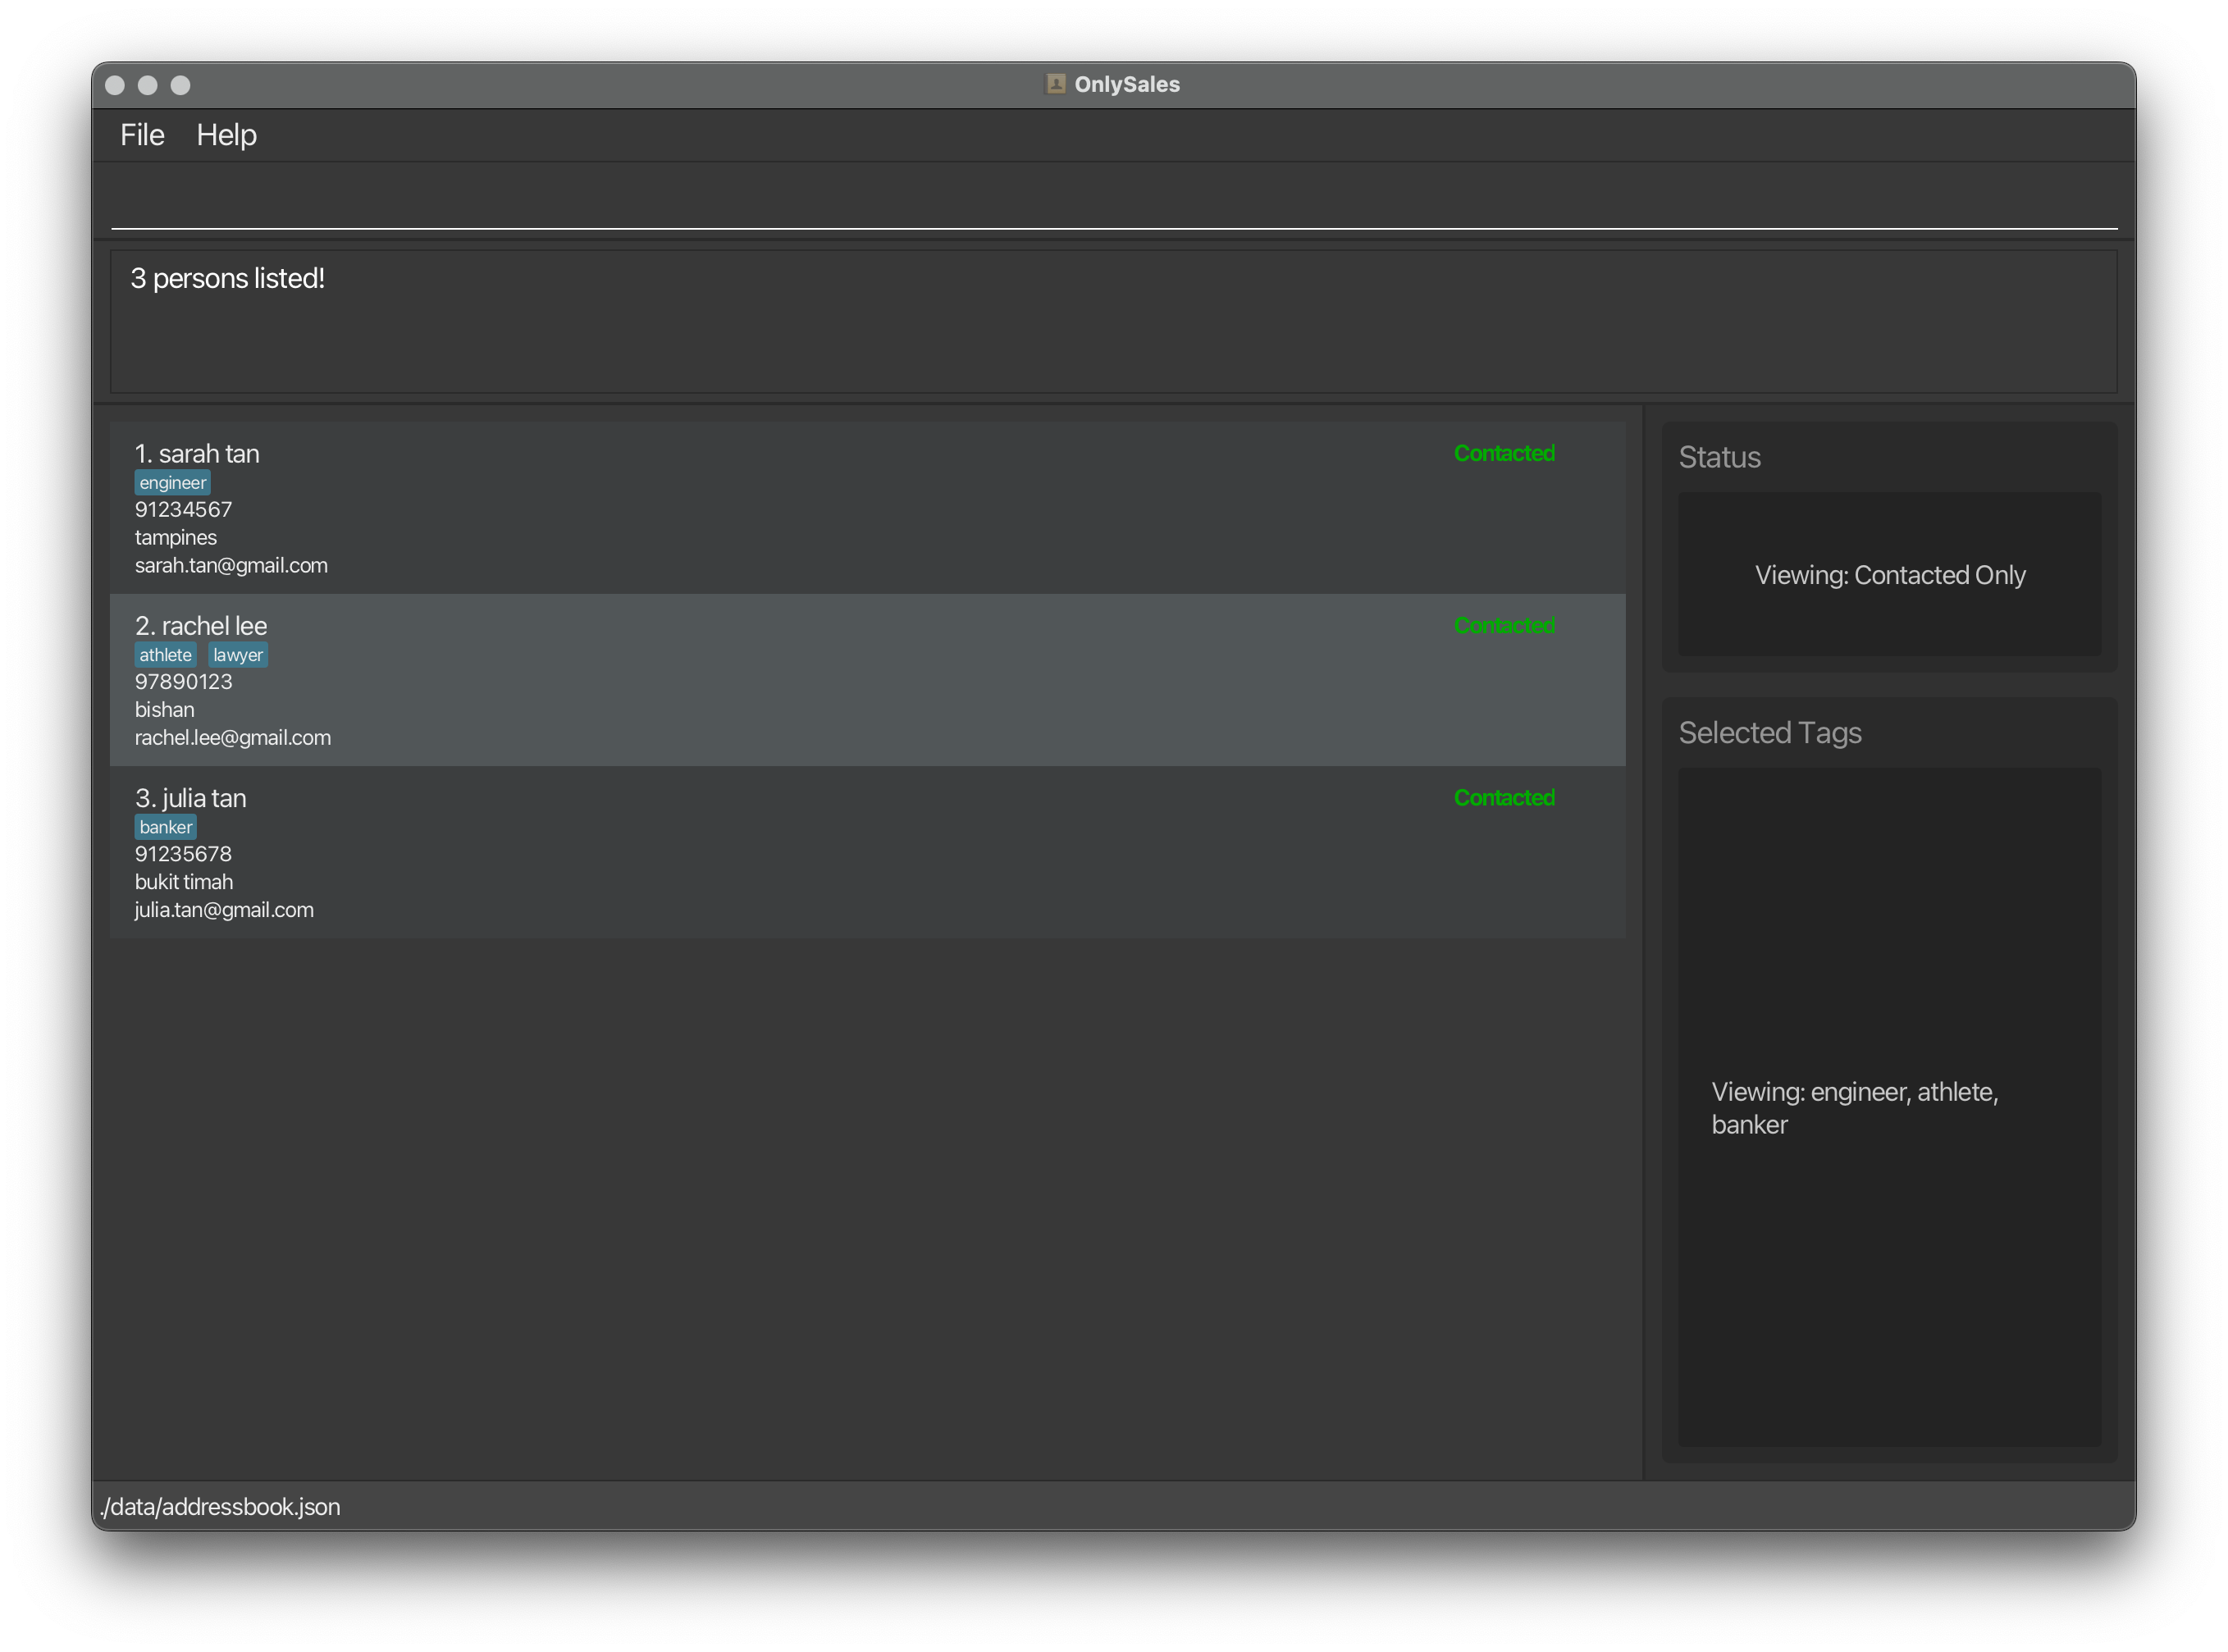 |
| Before applying find filters | Tag view and Status view show active filters |
Deleting a person : delete
Deletes one or more persons from the address book.
 Warning:
Deleting a contact is an irreversible process. Once deleted, the contact information cannot be recovered. Make sure you have exported your address book if you need a backup.
Warning:
Deleting a contact is an irreversible process. Once deleted, the contact information cannot be recovered. Make sure you have exported your address book if you need a backup.
Format: delete INDEX [MORE_INDICES]...
- Deletes the person(s) at the specified
INDEX(andMORE_INDICESif provided). - The index refers to the index number shown in the displayed person list.
- The index must be a valid number according to what is displayed in the list below (e.g., 1, 2, 3, …).
- Multiple indices can be specified to delete multiple persons at once.
- Indices can be provided in any order.
- All indices must be valid - if any index is invalid, the command will fail and no persons will be deleted. The error message will show which specific indices are invalid.
- All indices must be unique - if duplicate indices are detected, the command will fail and no persons will be deleted.
Examples:
-
listfollowed bydelete 2deletes the 2nd person in the address book. -
find Betsyfollowed bydelete 1deletes the 1st person in the results of thefindcommand. -
delete 1 3 5deletes the 1st, 3rd, and 5th persons in the displayed list. -
delete 4 2 6deletes the 2nd, 4th, and 6th persons in the displayed list (order doesn’t matter). -
delete 2 99(when only 2 persons exist) will fail with error message “Invalid index(es) detected: 99” and no deletions will occur. -
delete 1 1 3will fail with error message “Duplicate indices were detected! Please ensure all indices are unique.” and no deletions will occur.
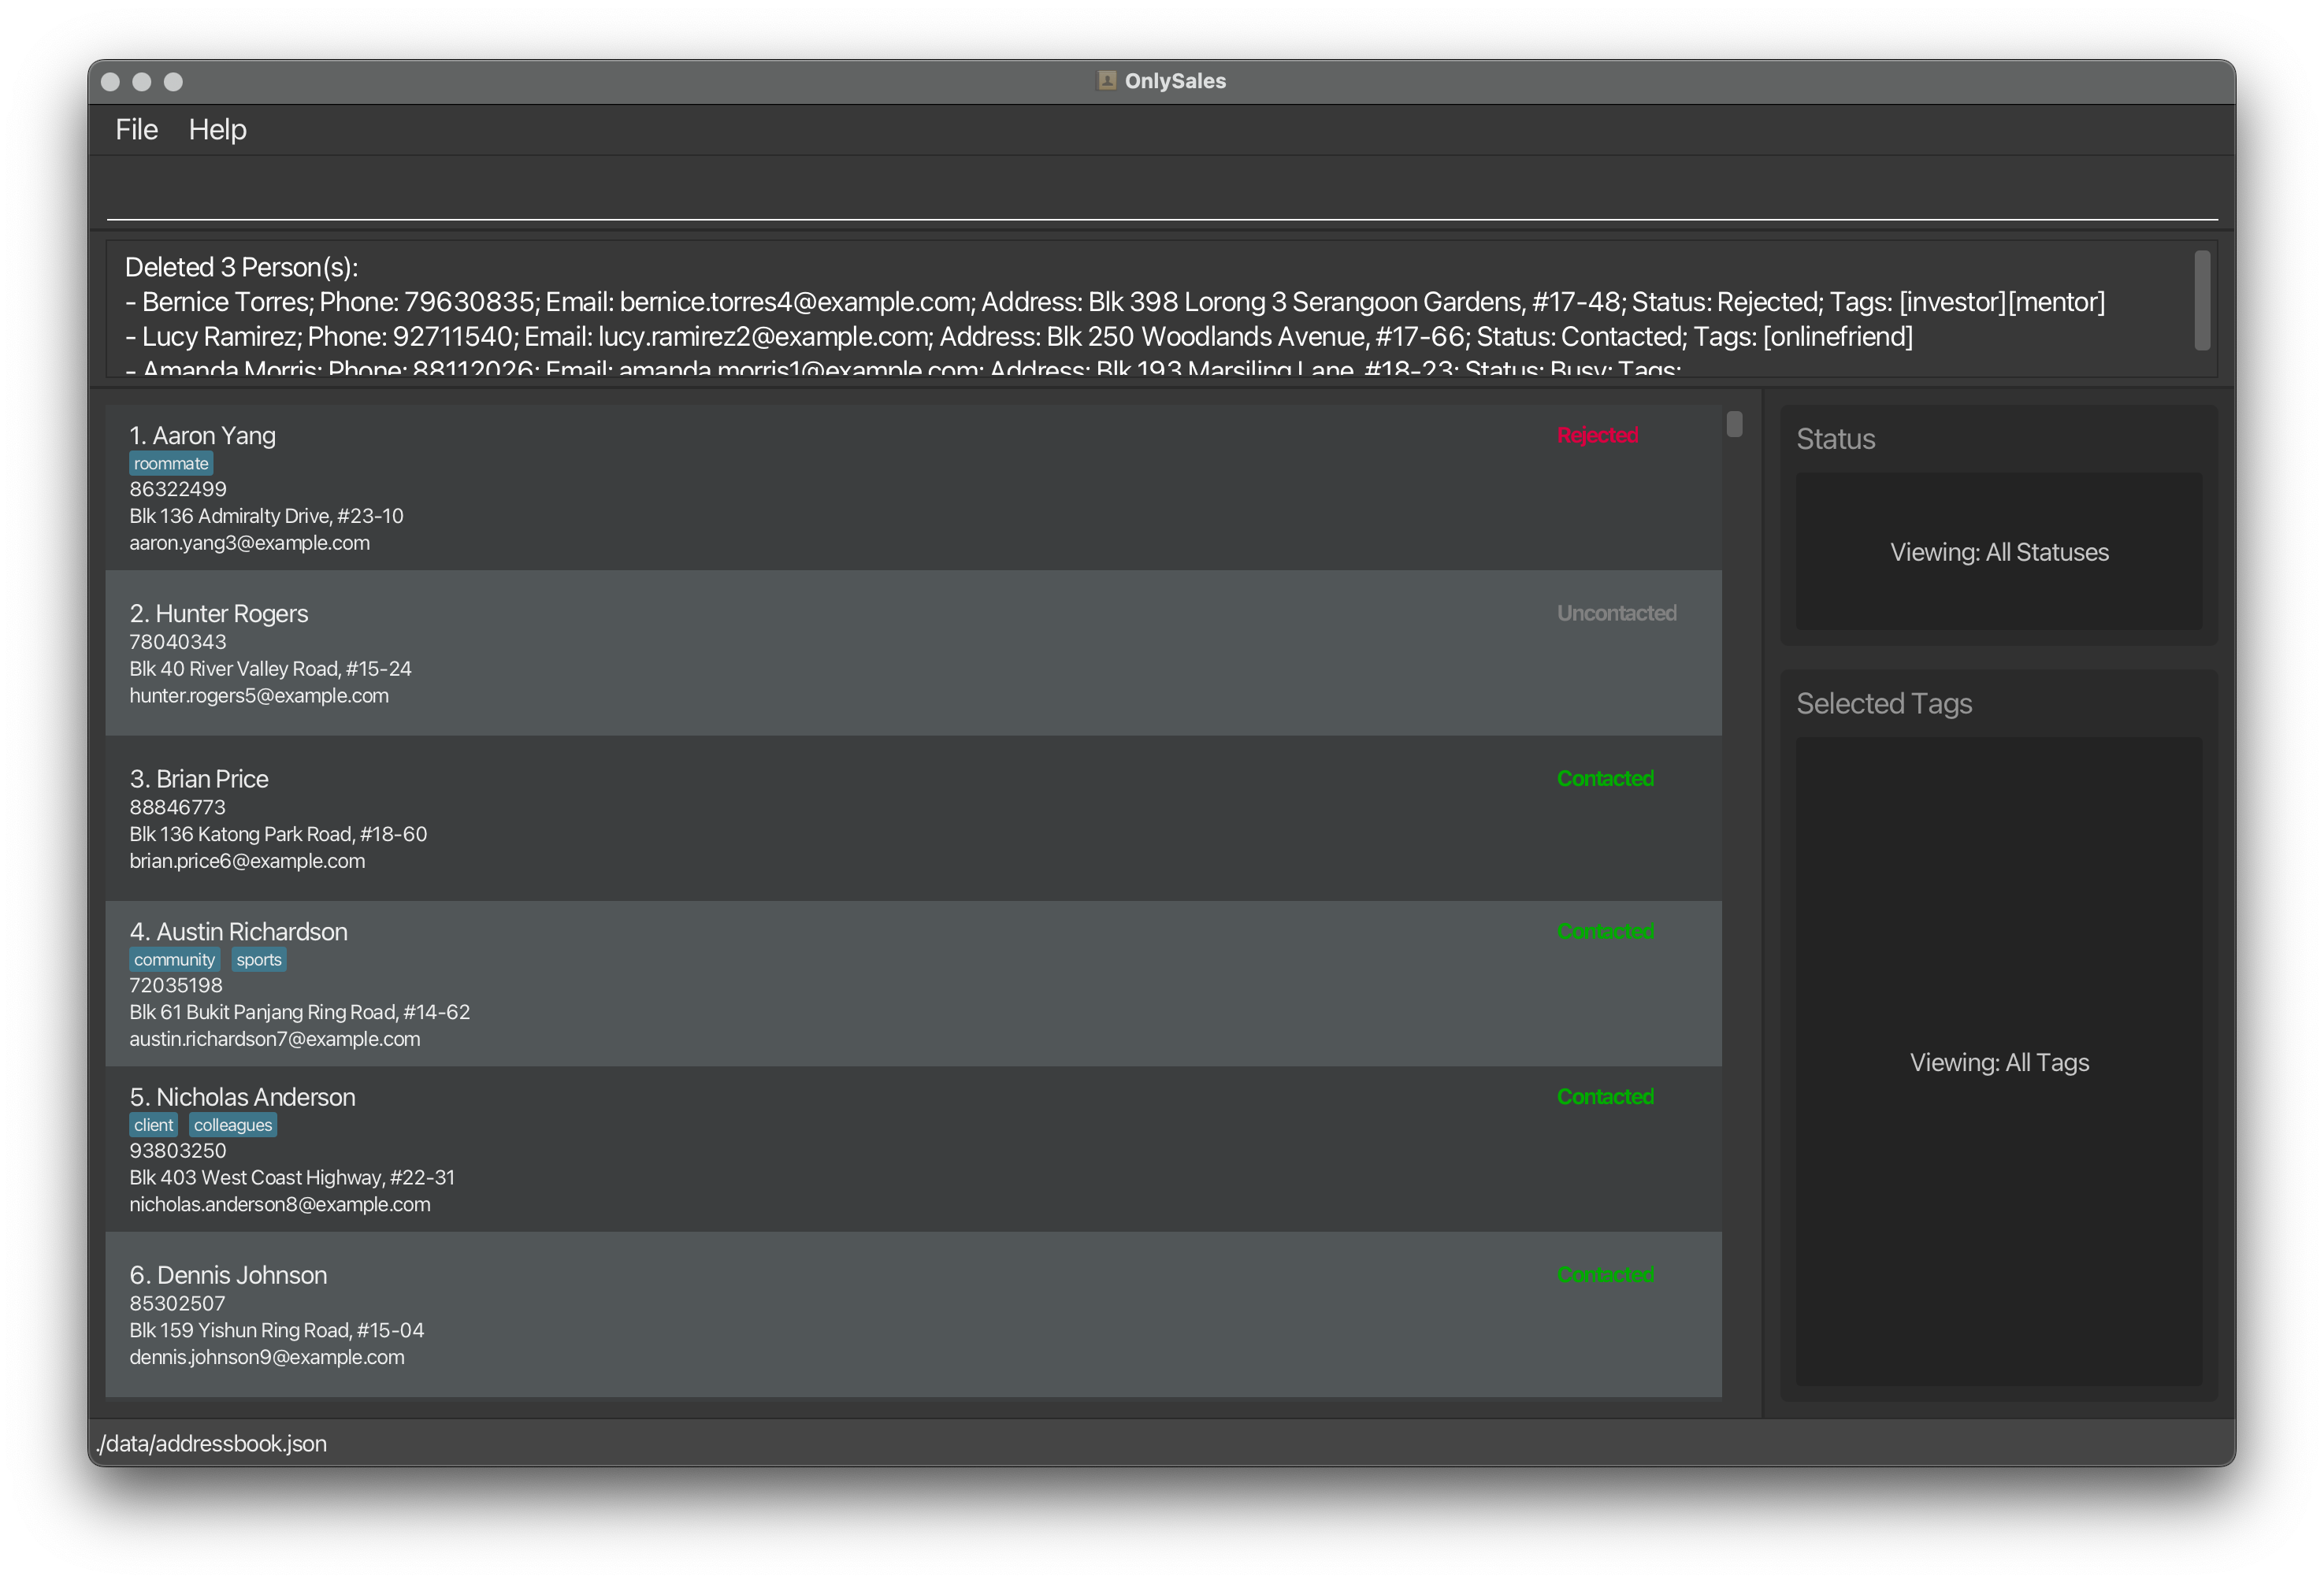 Example of where 3 contacts are deleted with the command
delete 1 2 3
Managing email templates :
Manages email templates for different contact statuses. You can open, edit, save, and copy templates to streamline your email communications.
Keyboard Navigation:
You can navigate between the command input box and the template editor using only your keyboard by pressing Tab to move to the template editor and Shift + Tab to return to the command input box.
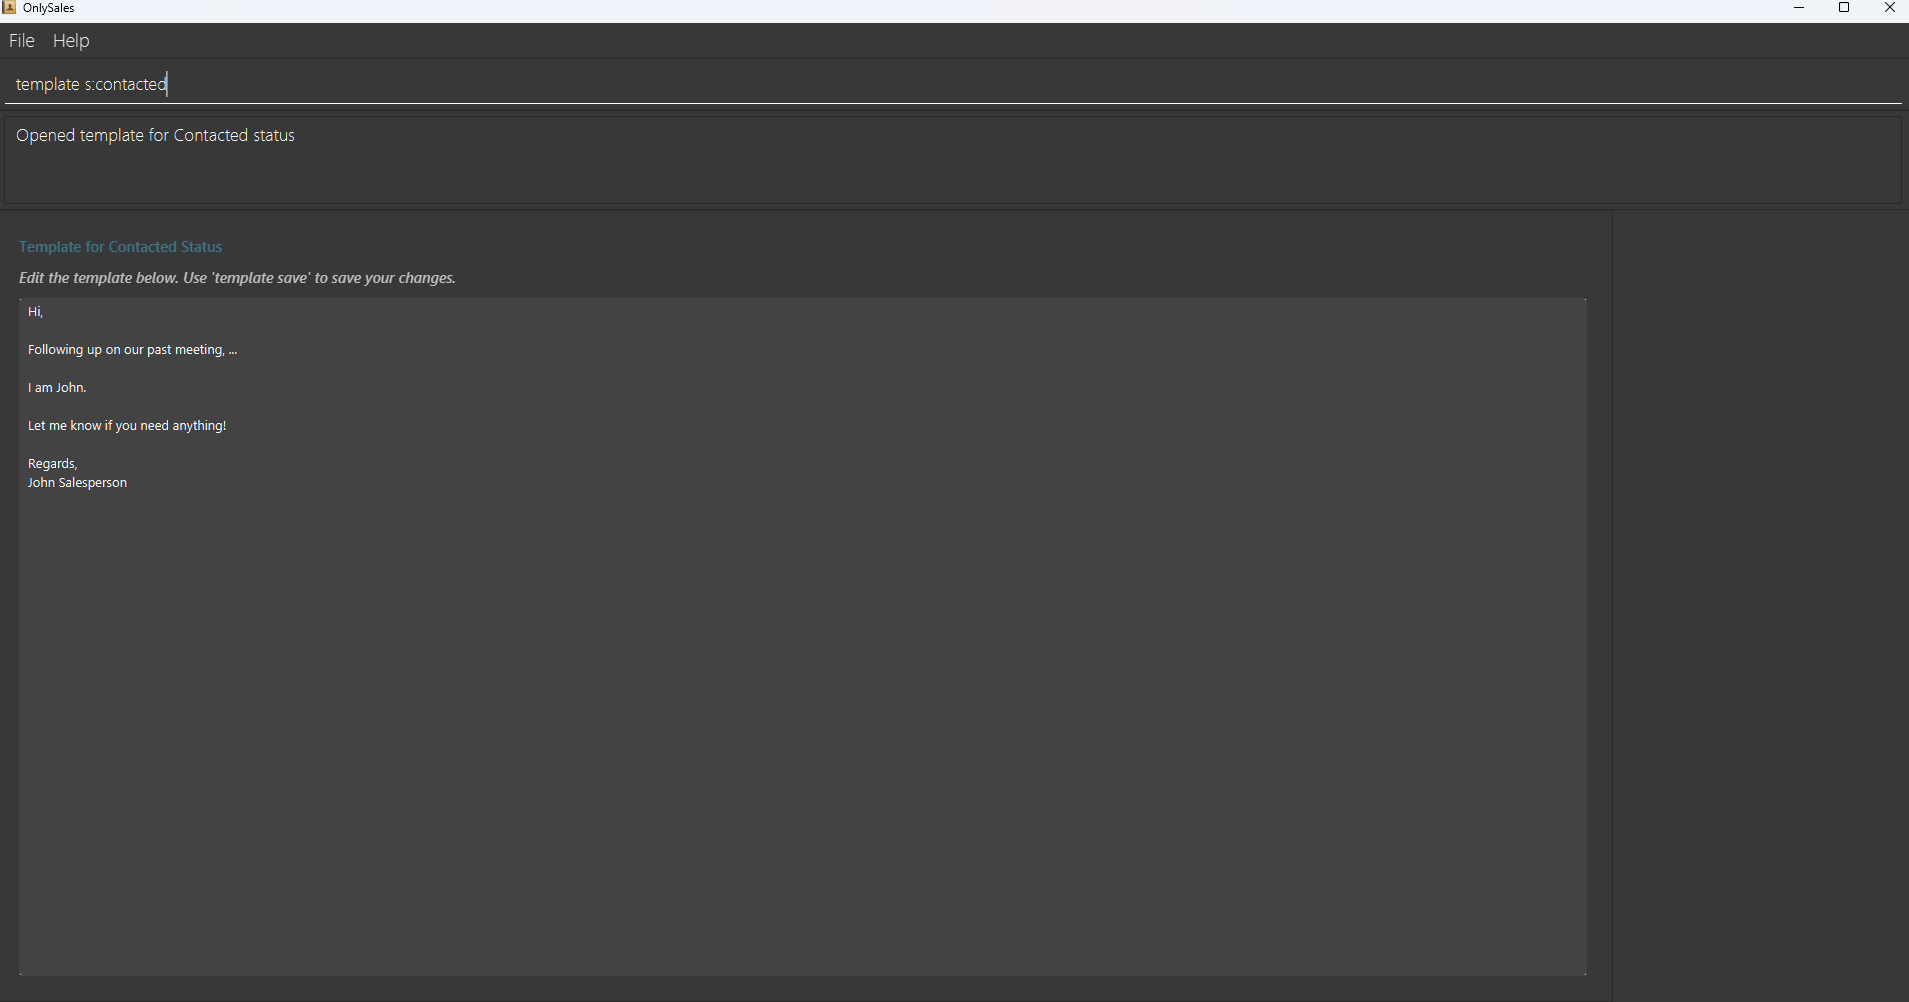
Opening a template for editing : template s:STATUS
Opens the template editor for a specific contact status.
Format: template s:STATUS
- Opens the template editor window for the specified
STATUS. -
STATUSmust be one of:Contacted,Uncontacted,Rejected,Accepted,Unreachable, orBusy. - Status is case-insensitive (e.g.
contacted,CONTACTED,Contactedall work). - The template editor allows you to view and edit the email template.
- If no custom template exists for the status, a default template will be displayed (e.g., “This is the default template for status Contacted”).
Warning:
Changes are not saved automatically - use template save to save your changes.
Examples:
-
template s:Contactedopens the template editor for the “Contacted” status. -
template s:rejectedopens the template editor for the “Rejected” status. -
template s:BUSYopens the template editor for the “Busy” status.
Saving the current template : template save
Saves the currently open template.
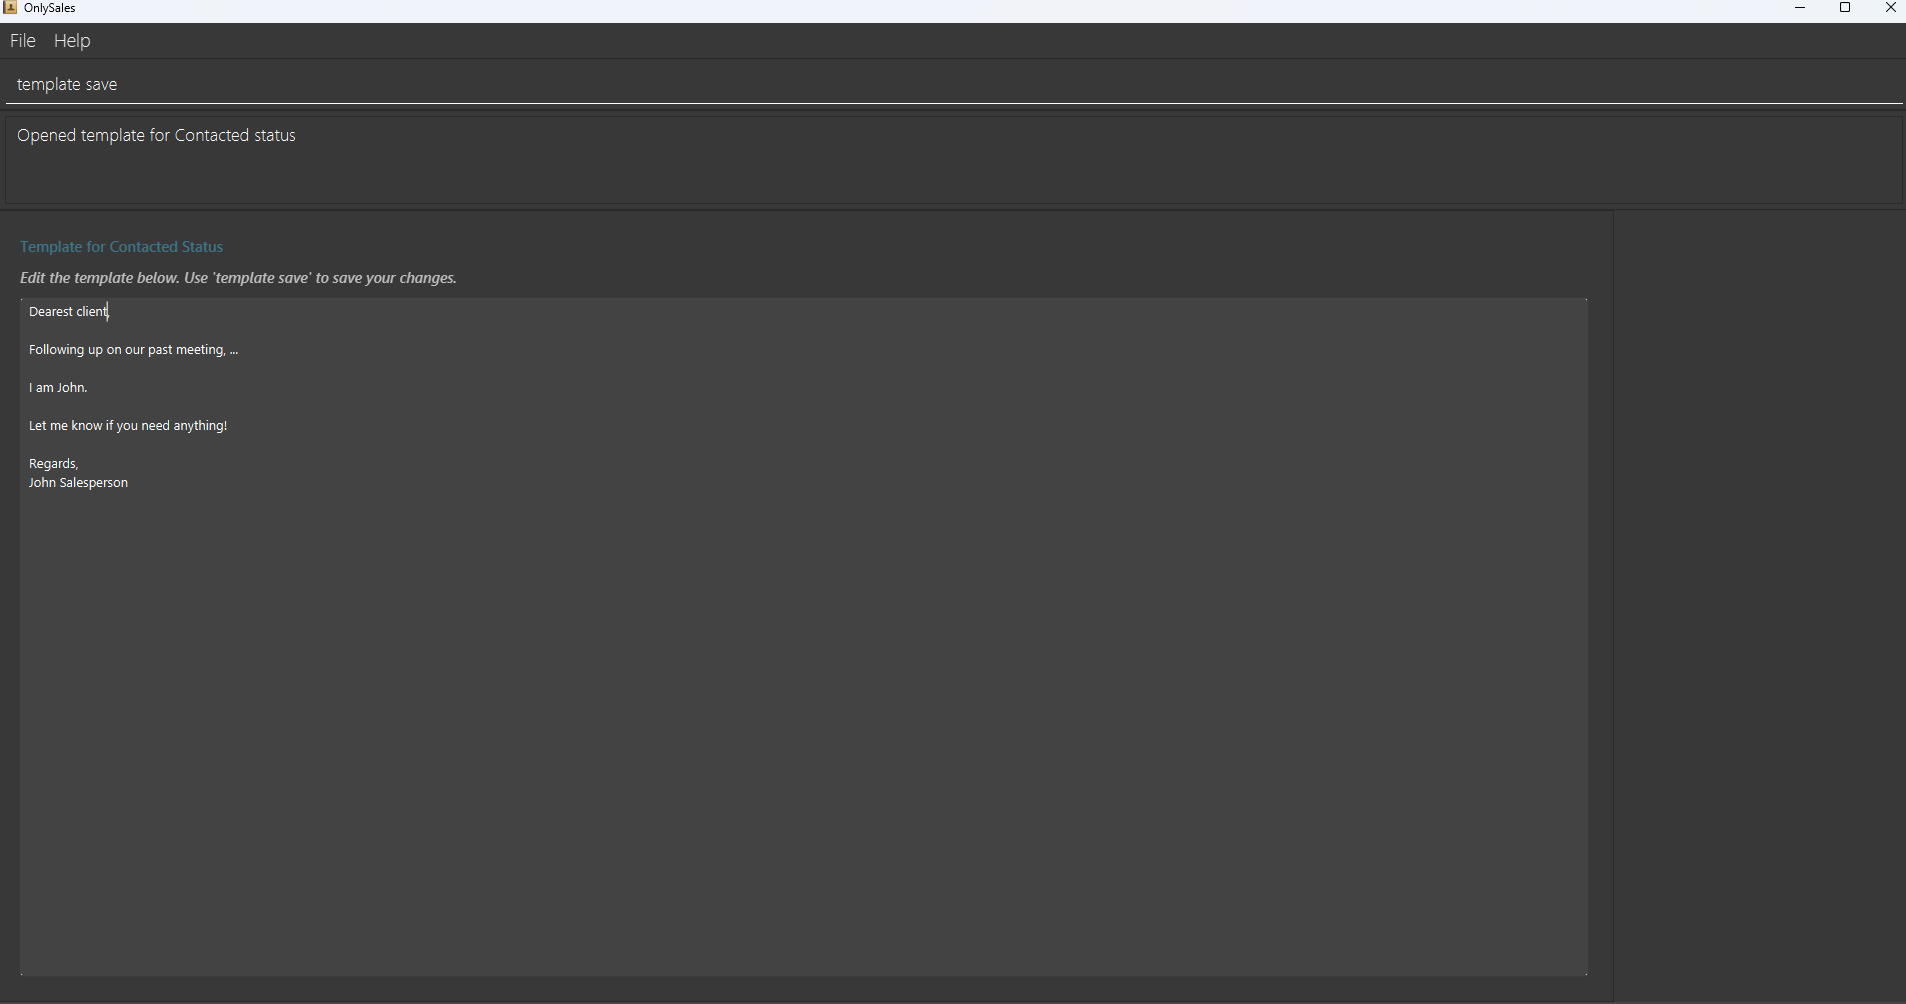
Format: template save
- Saves any changes made to the template currently displayed in the template editor.
- A template must be open (using
template s:STATUS) before you can save. - If no template is currently open, an error message will be shown.
- Important: If you save a template that contains only whitespace or is empty, it will be automatically replaced with the default template for that status.
- When saving blank content, you will see the message: “Detected empty template as input, saving as the default template instead.”
Examples:
- After opening a template with
template s:Contactedand making changes, usetemplate saveto save your edits. - If you clear all content and save, the default template will be restored.
Copying a template to clipboard : template copy s:STATUS
Copies the content of a template to your clipboard without opening the editor.
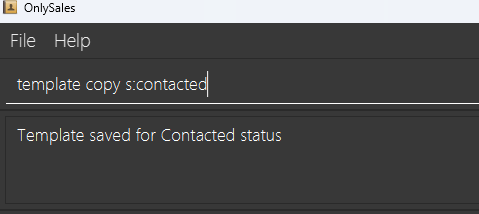
Format: template copy s:STATUS
- Copies the entire template content for the specified
STATUSto your clipboard. -
STATUSmust be one of:Contacted,Uncontacted,Rejected,Accepted,Unreachable, orBusy. - Status is case-insensitive.
- The template is copied as-is from storage - you can then paste it into your email client.
- Does not open the template editor.
- This command works anywhere in the application - you don’t need to have a template open to use it.
- If the template file contains only whitespace or is empty, the default template will be copied instead and the file will be automatically updated with the default template.
Examples:
-
template copy s:Contactedcopies the “Contacted” template to your clipboard. -
template copy s:unreachablecopies the “Unreachable” template to your clipboard.
Tip:
Use template copy for quick access to templates when you need to send emails, and use template s:STATUS followed by template save when you need to update your templates.
Note:
Templates are stored as text files in the templates folder in your application directory. Each status has its own template file.
Import contacts: import
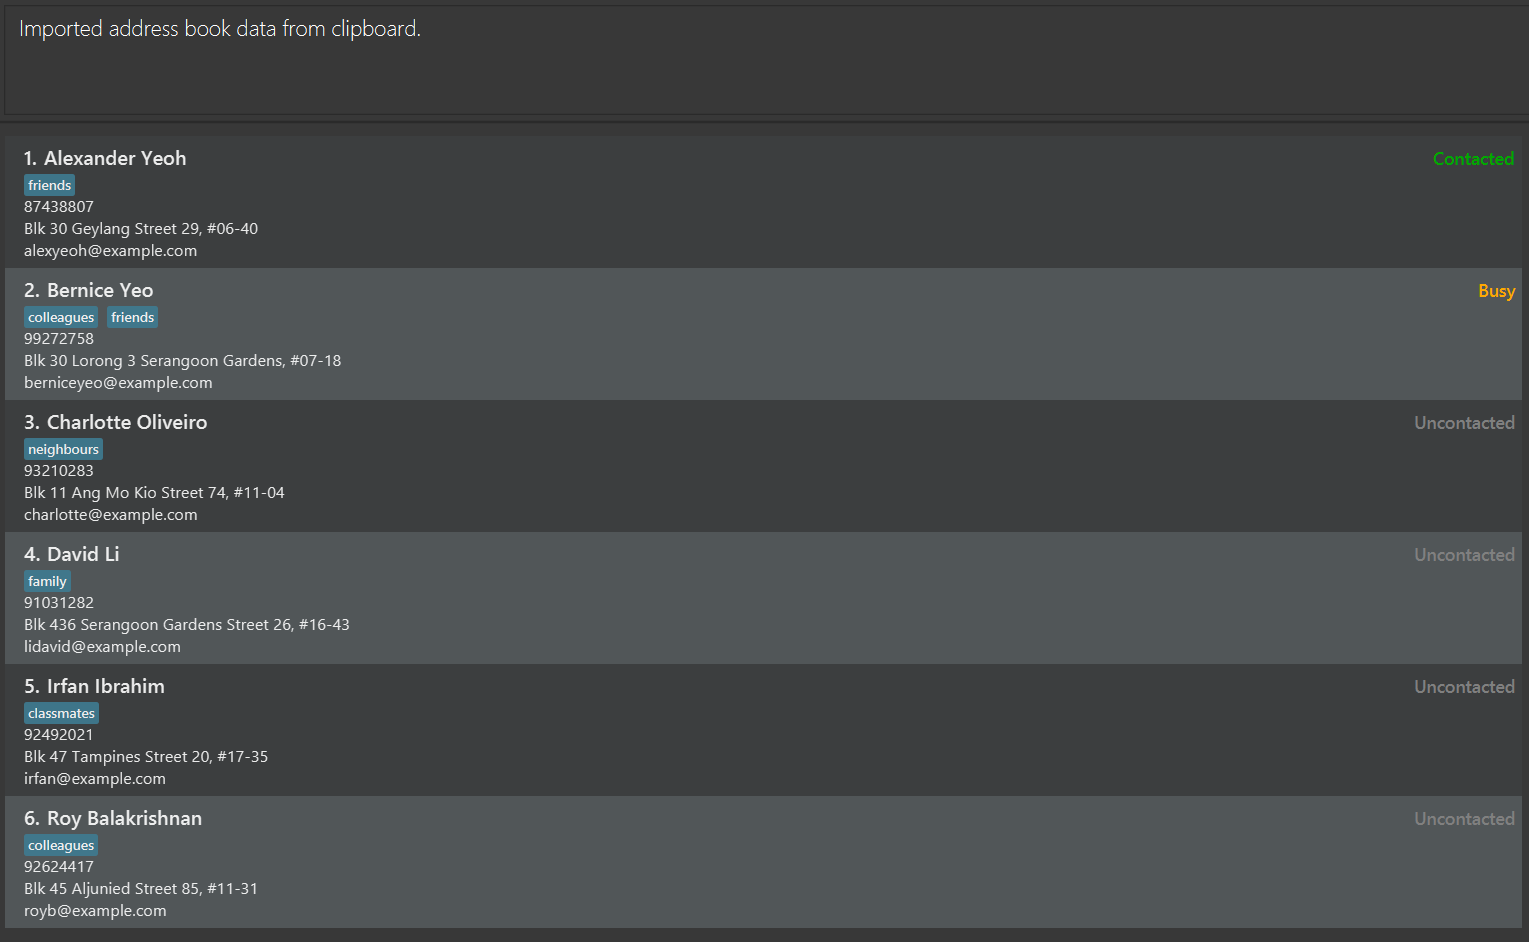
Imports an address book from the clipboard and replaces the current address book.
Format: import
- The address book data should be copied to your clipboard before running this command.
- Alternatively, press
F7to open the import preview window where you can review the contacts before importing. - The import will validate the JSON format and ensure all contacts meet the required field constraints.
Warning:
Import replaces your entire address book when data is valid. Make sure to export your current contacts first if you want to keep them.
Common error messages:
- “Clipboard does not contain any text to import” - The clipboard is empty. Copy the address book JSON data first.
- “Failed to import: Clipboard does not contain valid address book JSON.” - The clipboard content is not valid JSON or doesn’t match the expected address book format.
Examples:
- Copy address book JSON data to clipboard, then run
importto import all contacts. - Press
F7to open the import preview window and review contacts before importing.
Export contacts: export
Exports all contacts from the address book and copies all information to your clipboard. This allows you to share your contacts with other OnlySales users or create backups of your data.
Format: export
- Copies all contact information from your address book to your clipboard in JSON format.
- The exported data includes all contact information including names, phone numbers, email addresses, physical addresses, statuses, and tags.
- After running this command, you can paste the data anywhere (e.g., into a text file, share with another user, or use with the
importcommand).
Note:
The export command copies all information to your clipboard automatically. You can then paste it wherever you need it.
Tip:
You can use this with the import command to transfer your contacts between different OnlySales installations or share them with other users.
Clearing all entries : clear
Clears all entries from the address book.
Format: clear
Warning:
This action is irreversible! All contacts will be permanently deleted from the address book right after you enter the clear command!
Exiting the program : exit
Exits the program.
Format: exit
Saving the data
OnlySales data are saved in the hard disk automatically after any command that changes the data. There is no need to save manually.
Editing the data file
OnlySales data are saved automatically as a JSON file [JAR file location]/data/addressbook.json. Advanced users are welcome to update data directly by editing that data file.
Caution:
If your changes to the data file makes its format invalid, OnlySales will discard all data and start with an empty data file at the next run. Hence, it is recommended to take a backup of the file before editing it.Furthermore, certain edits can cause the OnlySales to behave in unexpected ways (e.g., if a value entered is outside of the acceptable range). Therefore, edit the data file only if you are confident that you can update it correctly.
FAQ
Q: How do I transfer my data to another Computer?
A: Install the app in the other computer and overwrite the empty data file it creates with the file that contains the data of your previous OnlySales home folder. Alternatively, you can use the import and export commands.
Q: Is my contact data secure?
A: OnlySales only stores data locally on your laptop, no data is sent to external servers. However, the data file is not encrypted, so do ensure that your device is password protected.
Q: How do I handle duplicate contacts?
A: It would be unlikely that there would be a duplicate as each phone number would be owned by a different person. You could resolve this by deleting the unwanted entries, or include or exclude the country code for local contacts.
Q: The app is not functioning as expected.
A: Do check the known issues and FAQ. If you have any issues, please file a bug report at: Customer Feedback Form
Q: Can I search for contacts by address?
A: Yes! You can use the advanced search feature with the a: prefix. For example, find a:Singapore will find all contacts with “Singapore” in their address.
Q: What happens if I accidentally delete a contact?
A: Unfortunately, deletion is permanent and cannot be undone. However, you can use the export command regularly to create backups of your address book, which you can then import if needed.
Q: How do I edit multiple contacts at once?
A: OnlySales currently supports editing one contact at a time using the edit command. To modify multiple contacts, you’ll need to edit them individually. However, you can use the find command to filter contacts and then edit them one by one.
Q: Can I use OnlySales without an internet connection?
A: Yes! OnlySales is a desktop application that works completely offline. All your data is stored locally on your computer.
Q: What file format does OnlySales use for storing data?
A: OnlySales stores all contact data in JSON format in the data/addressbook.json file. This makes it easy to backup, transfer, or even manually edit if you’re comfortable with JSON.
Q: How many contacts can I store in OnlySales?
A: There’s no hard limit on the number of contacts you can store. However, for optimal performance, we recommend keeping your address book under 10,000 contacts.
Q: Can I customize the email templates?
A: Absolutely! Use the template s:STATUS command to open and edit templates for any status. Don’t forget to use template save after making changes!
Known issues
-
When using multiple screens, if you move the application to a secondary screen, and later switch to using only the primary screen, the GUI will open off-screen. The remedy is to delete the
preferences.jsonfile created by the application before running. Alternatively, you can use theimportandexportcommands. -
If you minimise the Help Window or Import Preview Window, attempting to open them again (using
helpcommand,F1, orF7) will not create a new window. The remedy is to manually restore the minimised window.
Glossary
This glossary defines key terms used throughout this user guide to help you understand OnlySales better.
Address Book: The collection of all your contacts stored in OnlySales. This is saved as a JSON file (addressbook.json) in the data folder.
CLI (Command Line Interface): A text-based way to interact with OnlySales by typing commands instead of clicking buttons with a mouse.
Contact: A person’s information stored in OnlySales, including their name, phone number, email, address, status, and tags.
Export: The process of copying all your contact data to your clipboard in JSON format, which can then be pasted elsewhere or imported into another OnlySales installation.
Import: The process of loading contact data from your clipboard (in JSON format) into OnlySales, replacing your current address book.
Index: A number that identifies the position of a contact in the displayed list. For example, if you see a list of contacts, the first one has index 1, the second has index 2, and so on.
JSON (JavaScript Object Notation): A text-based data format used by OnlySales to store contact information. It’s human-readable and can be edited manually if needed.
Prefix: A short code followed by a colon (like n:, p:, e:) used in commands to specify what type of information you’re providing. For example, n: means name, p: means phone number.
This list is not exhaustive, just some examples of prefixes.
Status: A label that indicates the current state of a contact in your sales pipeline. OnlySales supports six statuses: Contacted, Uncontacted, Busy, Rejected, Accepted, and Unreachable.
Tag: A keyword or label you can assign to contacts for easier categorization and searching. A contact can have multiple tags.
Template: A pre-written email message associated with a specific contact status. You can customize templates and copy them to use in your email communications.
OR search: Any condition where at least one of the given conditions are true.
Command summary
| Action | Format, Examples |
|---|---|
| Add |
add n:NAME p:PHONE_NUMBER e:EMAIL [a:ADDRESS] [s:STATUS] [t:TAG]... e.g. add n:James Ho p:22224444 e:jamesho@example.com a:123, Clementi Rd, 1234665 t:friend t:colleague
|
| Clear | clear |
| Delete |
delete INDEX [MORE_INDICES]...e.g. delete 3 or delete 1 2 3
|
| Edit |
edit INDEX [n:NAME] [p:PHONE_NUMBER] [e:EMAIL] [a:ADDRESS] [s:STATUS] [t:TAG]...e.g. edit 2 n:James Lee e:jameslee@example.com
|
| Status |
status INDEX [STATUS]e.g. status 4 busy
|
| Find |
find KEYWORD [MORE_KEYWORDS] OR find [n:NAME] [t:TAG]... [s:STATUS] [p:PHONE] [e:EMAIL]e.g. find John, find n:alice t:friends s:Contacted
|
| List | list |
| Help | help |
| Template (Open) |
template s:STATUSe.g. template s:Contacted
|
| Template (Save) | template save |
| Template (Copy) |
template copy s:STATUSe.g. template copy s:Rejected
|
| Import Contacts | import |
| Export Contacts | export |